Showing posts with label DIY. Show all posts

Tuesday, August 12, 2014

That Time a Bench Made me Cry

This bench. Our relationship was a tragic love story with a happy ending.

The short version goes something like this: I fell in love, it broke my heart again and again, I cried, we made up, and I fell in love all over. 

The longer version is a bit more detailed:

From the minute I saw I was in love.  However, the sloppy white paint job with out-dated blue and white checkered fabric (I spared you the awfulness of where it started) just wasn't doing it for me.
Before Bench
See that great white paint? Whoever painted it was on a mission to make sure the paint never. came. off.

After 3 hours of sanding with the lowest grit I could find I'd barely made a dent. At this point I was in serious need of a plan B.
Before Bench

Insert plan B. Y'all this stuff is no joke... 
Paint Stripper

Paint Stripper
(See the blue and white checkered fabric in the background?!? Yup, that's where we started)

Four bottles, 50 gloves, 2 industrial strength gloves, and 5 hours later we were left with this. Pretty right? :-/
Bench In Progress

PS: When the directions say industrial strength gloves only. They mean industrial strength gloves ONLY. It took 50 gloves and countless burns (stubborn much?) for us to finally throw in the towel and purchase the real deal. Do yourself a favor. Follow the directions!

After even more sanding we finally got a blank slate. So clean and pretty!
Bench Sanded

Now the fun part...

I had a very specific vision for what I wanted the end product to look like. Problem? I didn't know how to get it there.

We have dark floors so I didn't want it too dark, but I still wanted it natural looking but a little darker than what it was while not really looking stained at all. Confused? So was I.

I tried one stain and hated it! It was orangey redish and all wrong.
Bench In Progress

My mom suggested a light grayish wash. Had she done it it would have looked great, but I did it so it didn't.

So, the only option I saw was to re-sand and start over...again. At this point James was done. He told me to do what I wanted, but he was over it. I can't blame his at all; I was impossible to please.

After thee trips to Home Depot and 2 different stains I was done. It wasn't working and I quit.
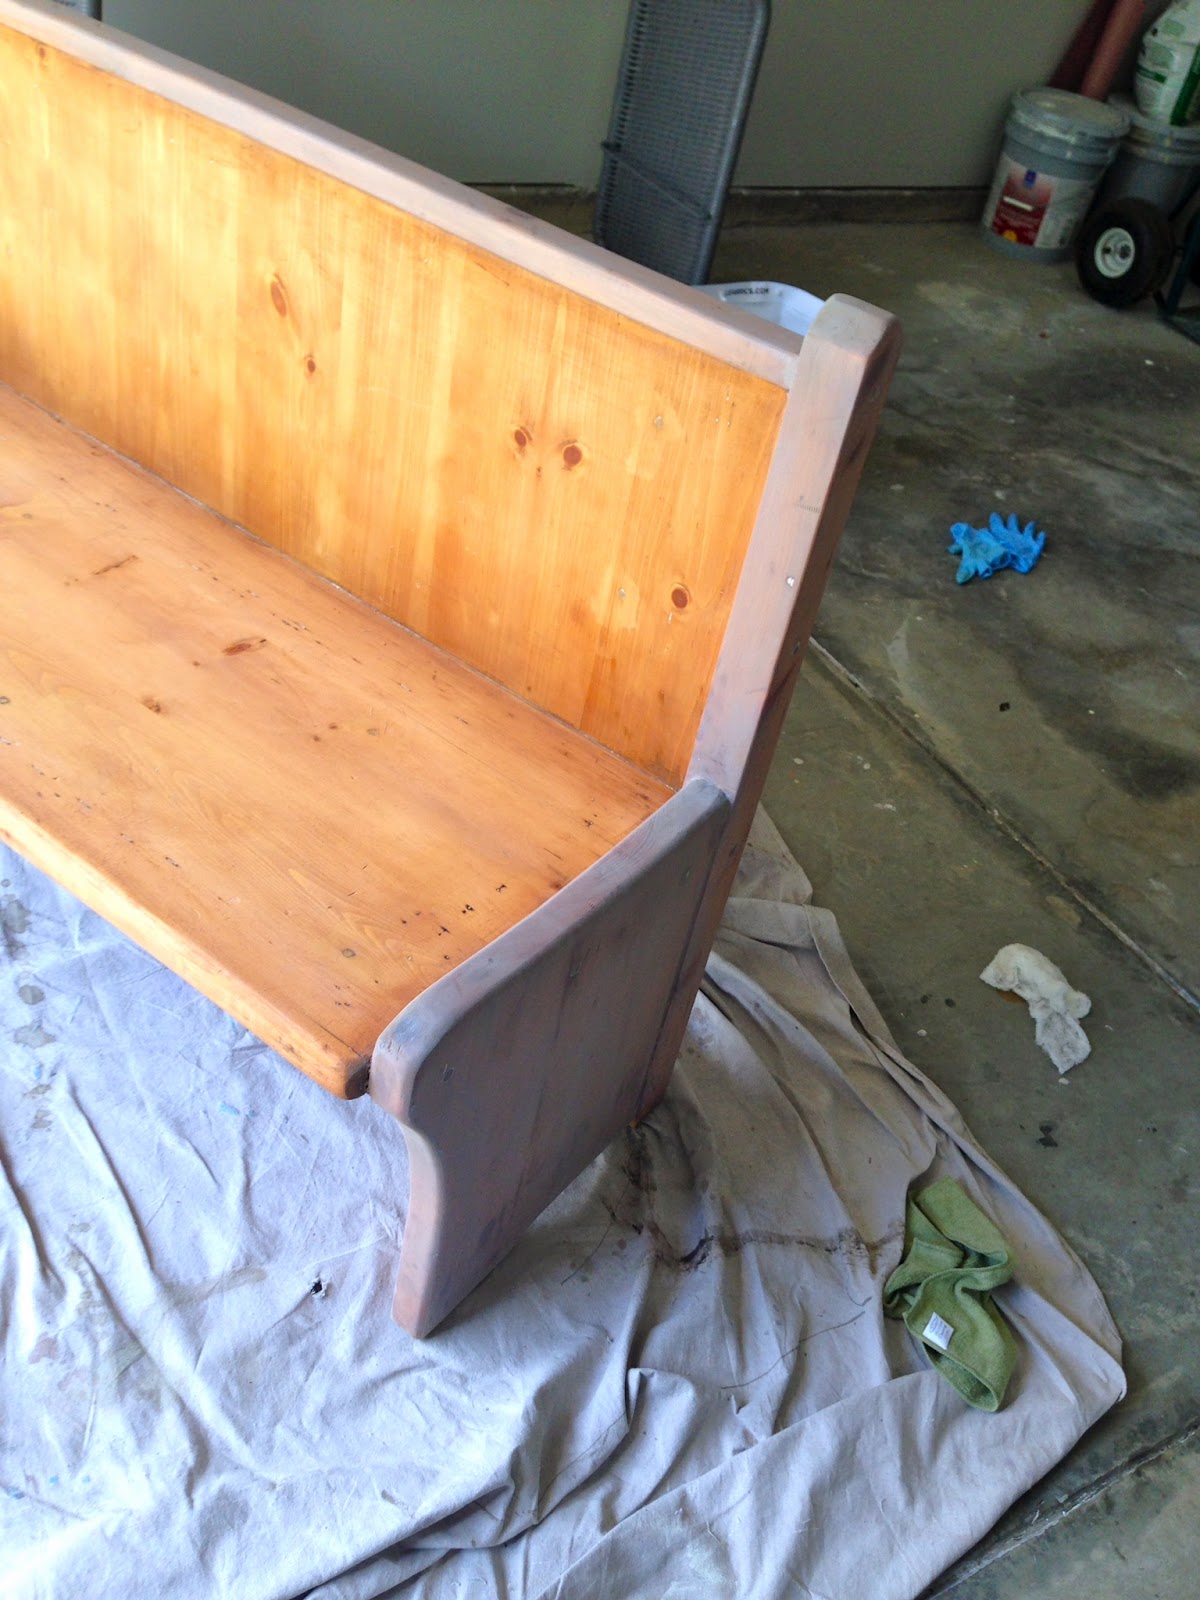
Y'all, I cried over bench. If it hadn't been for James stepping in it would have ended up smashed into a million pieces. Have I mentioned I can be dramatic at times?


It took a few days and a "get your act together" conversation with my sister to realize I was being ridiculous crazy.

I went to Home Depot one more time picked up one more stain and was officially done. 
DIY Bench

I fell in love all over again. It doesn't match my original vision, but quite honestly it's even better. 

I told the husband I reserve the right to change it at any point. He said no. I don't blame him :)

 photo signature_zpsf929bc8c.png

Thursday, May 22, 2014

House Tour

I'm so excited to give y'all a tour of the house today! 

It's not done yet, and I'm sure we'll continue to update it over the years, but I'm loving the upgrades we've made so far. I felt inspired by Young House Love to add a to-do list for each room. This is to remind myself of how much we've done and keep inspired about where we want to go. Some of the projects we still have to go will be done in the next few weeks and some won't be done years.

Take a look around. Hope you enjoy!

Foyer:
Anyone surprised that I'm obsessed with the front door? Ya, I didn't think so. It almost makes me want to forget about getting a new one. Call me crazy, but I want a door with a little more privacy. Like no big window and a peep hole kind of privacy. But, the pretty color will tie me over until the time comes to replace it. 


To Do: 
  • Remove parquet floors and replace with hardwoods
  • Paint front door, wall above and below chair rail  
  • Replace foyer light
  • Remove popcorn ceilings and repaint 
  • Add a bench
  • Put down rug
  • Replace blinds on door with roman shade
  • Hang some art (collage wall?)
  • Replace doorbell
  • Paint or upgrade door handles
  • Replace front door

Living Room:
This room is starting to come together. I think with a few more chairs, nice big ottoman, and a rug it will have a more cozy feel. And can we please talk about how excited I am to have a mantle? Can't wait to hang something on it at Christmas!


To Do:
  • Remove parquet floors and replace with hardwoods
  • Remove popcorn ceilings and repaint
  • Paint walls
  • Add furniture
  • Put down rug
  • Do something with the fireplace (paint? tile?)
  • Make/hang curtains
  • Change ceiling fan
  • Get gas logs for fireplace
  • Find/make a large square ottoman 
  • Paint red table

Dining Room:
If I had to pick a favorite room based on color it would be a hard choice between this room and the master bedroom. I love the blue and grey together. Fun fact: that dining room table is the same one I had growing up. I can't wait to give it a facelift.

To Do:
  • Remove parquet floors and replace with hardwoods
  • Remove popcorn ceilings and repaint
  • Paint walls above and below chair rail 
  • Add furniture
  • Put down rug
  • Paint chandelier
  • Take down blinds
  • Sew and hang new curtains
  • Replace sliding doors with french doors
  • Stain table

Kitchen:
This is probably the room I have the biggest plans for, but also going to be the room that is a work in progress for years. Most of the plans I have for this room are on the 5+ years plan, but hey, a girl can dream!

To Do:
  • Remove tile floors and replace with hardwoods
  • Remove popcorn ceilings and repaint
  • Update old lighting
  • Remove desk and cabinets above
  • Get table for eat in area
  • Paint cabinets 
  • Add hardware
  • Upgrade sink to farmhouse sink
  • Add backsplash
  • Upgrade appliances
  • Add curtains
  • Put down a rug/rugs
  • Add open shelving
  • Install vent hood
  • Do something fun with pantry doors

Stairs
This may sound strange, but this is one of my favorite updates! They turned out better than we hoped and I'm so happy we choose to stain and didn't re-carpet them.


To Do:
  • Remove carpet from wood stairs
  • Paint walls
  • Stain and polyurethane stairs
  • Paint stair risers
  • Add hardwoods to landings
  • Hang art
  • Demo short wall on stairs and half wall in hallway
  • Add railing and stair spindles

Master Bedroom:
Gotta give James props for trusting me with this accent wall. He was a little unsure of the idea when he first heard it, but he's totally onboard now. 


To Do:
  • Replace carpet
  • Remove popcorn ceilings and repaint
  • Paint walls
  • Add furniture 
  • Remove blinds and upgrade
  • Replace ceiling fan
  • Hand headboard
  • Add something above headboard (art? saying?)

Master Bathroom:
Probably one of James' favorite features in the house is this vanity. No, not because it's for him, but because I use it. I've always done my makeup sitting down which, since I've never had a vanity, meant I did my makeup sitting on the floor in our living room at the apartment. I would say it's not as odd as it sounds, but he would disagree. He hated it. He loves that my makeup has its very own special place in our bathroom. 


To Do:
  • Remove old carpet and replace with tile
  • Paint walls
  • Remove popcorn ceilings and repaint
  • Renovate shower
  • Paint cabinets
  • Add hardware
  • Update sinks and counter tops
  • Upgrade lighting

Hallway


 To Do:
  • Remove old carpet and replace with new
  • Remove popcorn ceilings and repaint
  • Paint walls
  • Paint doors?
  • Upgrade or paint door handles
  • Demo half wall and replace with rail and spindles
  • Hang art
And that's it! 

There are a few other rooms I may introduce you to at some point. However, right about now they are home to boxes that have yet to be unpacked, and nobody wants to see that!

 photo signature_zpsf929bc8c.png

Wednesday, February 19, 2014

DIY: Date Night Jar

James and I agreed not to exchange presents this year for Valentine's Day, so of course that means I make him something :) That doesn't count as a present... right? I've seen these "Date Night Jars" all over Pinterest and figured I'd try making my own. Most of them use popsicle sticks to put the date ideas on, but I didn't have any and it was snowing so paper worked just fine for me. 


This project was super easy, and I had it done in just a few hours. It was huge hit when he opened it. That was until he dropped it less than 24 hours later and the jar shattered. I guess it's the thought that counts.


Materials used:
    • Mason Jar or other clear jar with a lid
    • Paper: 3 different colors
    • Mod Podge (um... I've most definitely always called this stuff "Modge Podge")
    • Sharpies
    • Ribbon
I started out by brainstorming different date ideas. Some of them were dates we've been talking about and other came from doing a little online research. I liked the idea of using different colors to represent different date categories.


 Blue: "Stay @ Home Date Ideas"
    • Appetizers & Movie Night
    • Take Out & Board Games
    • Pizza & Italian Movie
    • Indoor Picnic
    • Wine & Cheese Night
    • Movie Night w/ Candy & Popcorn
    • Living Room Camp-Out
    • Cook a new meal together

Green: "Inexpensive Date Ideas"
    • Bowling
    • Dessert Only Date
    • Hiking 
    • Ice Cream Date
    • Picnic @ the Park
    • Donuts & Coffee
    • Food Truck Dinner Date
    • Drive-In Movie

Manilla: "Pricey & Planning Date Ideas"
    • Progressive Meal
    • Wine Tasting
    • Staycation
    • GA Aquarium
    • Weekend away in Nashville
    • Day Trip to Serenbe
    • Fancy Night Out
    • Day Trip to North GA 

I made the jar label using PicMonkey, and then painted on a think layer of Mod Podge on the back and centered it on the jar. 
 photo DateNightJar_zps42f662dd.jpg


And that's it! Super easy and I love[d] how it turned out... at least while it lasted!


 photo TuesdayTeaButton_zps92c320b6.png 
Linking up with Khala, Samantha, Renee, and Jenni

 photo signature_zpsf929bc8c.png

Tuesday, January 21, 2014

DIY: Bookshelf

I haven't done a DIY post in a while and I really love how this project turned out. When I first found out I was getting my very own office I knew I needed a bookshelf for all those books I collected in grad school. Do you have any idea how expensive bookshelf are? There had to be a better way. Mom and I are super ambitious and Dad builds things. Between the three of us we had to be able to figure this out.

Before we get started I have to share this again. Dad was out of town for the night. Mom and I decided we had this under control. We figured we could handle the belt sander ourselves. We couldn't. This still makes me fall on the floor laughing.


We used 3 2x6x10 wood boards. You can find them at any home improvement store and in pretty much any length or width you want.

They had to be sanded...a lot. We obviously gave up on the belt sander and used the much safer electric hand sander. You can sand down the knots if you want, but I left as many as I could because I like character :)
Pre and post sanding: 
Make sure to round the edges. Don't want to bump into any rough sharp edges!

Then the fun part! Staining! I'm on a dark wood kick right now. We used dark walnut mixed with a little ebony to get this color. We "painted" it on, waited about 5 minutes, and then buffed it off. Super easy!

After we let it dry for about 24 hours we painted on a satin polyurethane to protect the wood and finish it off. 

To create the shelves we bought 24 3/4'' black iron floor flanges and 3/4''x16'' pipes. We just spray painted the pipes black but you can probably find black pipes pretty easily. The floor flanges are about $10 each at home improvement stores, but we found them much cheaper online. Do some research to get the best prices.

We added 6 2'' black wheels on the bottom to make it easier to move around. 

Finished product! It turned out even better than I hoped it would! I wouldn't be upset if it ended up in our home one day :)

Please excuse the totaled car in the back. Sis and I got in a wreck on the way back from one of my wedding showers. We were fine. Carlos, the CRV, was not :(


Please let me know if you have any questions!

 photo signature_zpsf929bc8c.png

Wednesday, November 27, 2013

DIY: Story About Doors

I've received a few emails asking about the wedding doors. Rather than answer each email individually I figured I'd answer as many questions as I can here. I received question like: how did we put the frame together, how did we stabilize them, and did the doors actually open and close? 
Before I answer what I can I should preface this post. My dad owns a construction business; he builds things. I don't and I most definitely didn't build these. However, I spoke to mom and dad about how he build this and what materials he used. He used a bunch of words I didn't know, but I tried my best to keep up.
So, here is the wedding doors how-to as I understand it!


Here is the diagram I drew based on what he told me:

    • To build everything "we" used 2x6 boards i.e. these
    • The doors definitely opened and closed (that was the whole point for us). We used black hinges that attached to the doors and the frame
    • We attached handles to one side of the door and not the other. They swung out, so we attached them to the outside side. 
    • For extra stability we drove cut rebar (15 inches) into the ground. Your local hardware store will probably have other stakes in various materials that would work.
    • We placed large ferns in front of the A-frame so you couldn't see it. You can see that better in the picture below.
    • The platform 2x6 boards on both sides of the frame (that laid flat on the ground) are important to keep the doors and frame upright preventing them from falling over on your guests!
    • To attach the sigh above the doors we used metal brackets (can see better below)
    • The frame was built and assembled beforehand. The doors and sign were attached at the venue.


The three pictures below may give you a better idea of the frame, hinges, and how we tried to camouflage the ugly important stuff.

I hope this helps at least a little bit! Good luck!

 photo signature_zpsf929bc8c.png

Thursday, November 7, 2013

Office Tour

I'm so excited to share my new office with y'all!
About a month ago I first found out I was going to get my very own office. My first thought was "I got to get my diplomas framed!" I was beyond thrilled and couldn't wait to start planning/decorating and making it my own. I'm only being slightly dramatic when I say it felt like I was getting a home. My first call {after the husband} was to my mom and we immediately got to work. She really helped me to put the "look" together. I explain to her what I'm thinking {in my own broken decorating language} and she somehow makes it happen. That's how we work. Seriously, couldn't have done this without her.

First the before...
I apologize for the awful blurry phone picture. I didn't think anyone but mom was going to see these, but alas in the midst of all the "moving in" excitement I totally forgot to take before pictures with my big girl camera. It wasn't a bad before, just a little sparse and in need of some personal touches.


And now, the after...

Curtains & Grey and Yellow Pillows: Homegoods
While we bought a few things, most of it was DIY projects. 
Mom found the two chairs at a garage sale and picked them up for cheap. They looked fine before, but just didn't fit what I was thinking. Remember my obsession with Annie Sloan paint? Yup, she came to the rescue again! So easy to paint! However, reupholstering the chairs, totally different story. If I never pull another staple out of a chair it will be too soon!

My favorite part?


This bookshelf that we built! I got the idea from one of James' friends. Mom and I took a picture to Lowes and asked a guy for help. He had serious doubts about our abilities and told us we were better off buying a bookshelf. His doubts made us all the more confident... and we planned on having dad do the building all along. I do know what floor flange is now and that we will never again use the belt sander without supervision

I love having place for all my old school books, and James loves that they aren't in the apartment anymore!

I love it so hard and love going into work everyday!
Thanks for letting me give you a tour! Happy Thursday!

 photo signature_zpsf929bc8c.png