Showing posts with label furniture. Show all posts

Tuesday, August 12, 2014

That Time a Bench Made me Cry

This bench. Our relationship was a tragic love story with a happy ending.

The short version goes something like this: I fell in love, it broke my heart again and again, I cried, we made up, and I fell in love all over. 

The longer version is a bit more detailed:

From the minute I saw I was in love.  However, the sloppy white paint job with out-dated blue and white checkered fabric (I spared you the awfulness of where it started) just wasn't doing it for me.
Before Bench
See that great white paint? Whoever painted it was on a mission to make sure the paint never. came. off.

After 3 hours of sanding with the lowest grit I could find I'd barely made a dent. At this point I was in serious need of a plan B.
Before Bench

Insert plan B. Y'all this stuff is no joke... 
Paint Stripper

Paint Stripper
(See the blue and white checkered fabric in the background?!? Yup, that's where we started)

Four bottles, 50 gloves, 2 industrial strength gloves, and 5 hours later we were left with this. Pretty right? :-/
Bench In Progress

PS: When the directions say industrial strength gloves only. They mean industrial strength gloves ONLY. It took 50 gloves and countless burns (stubborn much?) for us to finally throw in the towel and purchase the real deal. Do yourself a favor. Follow the directions!

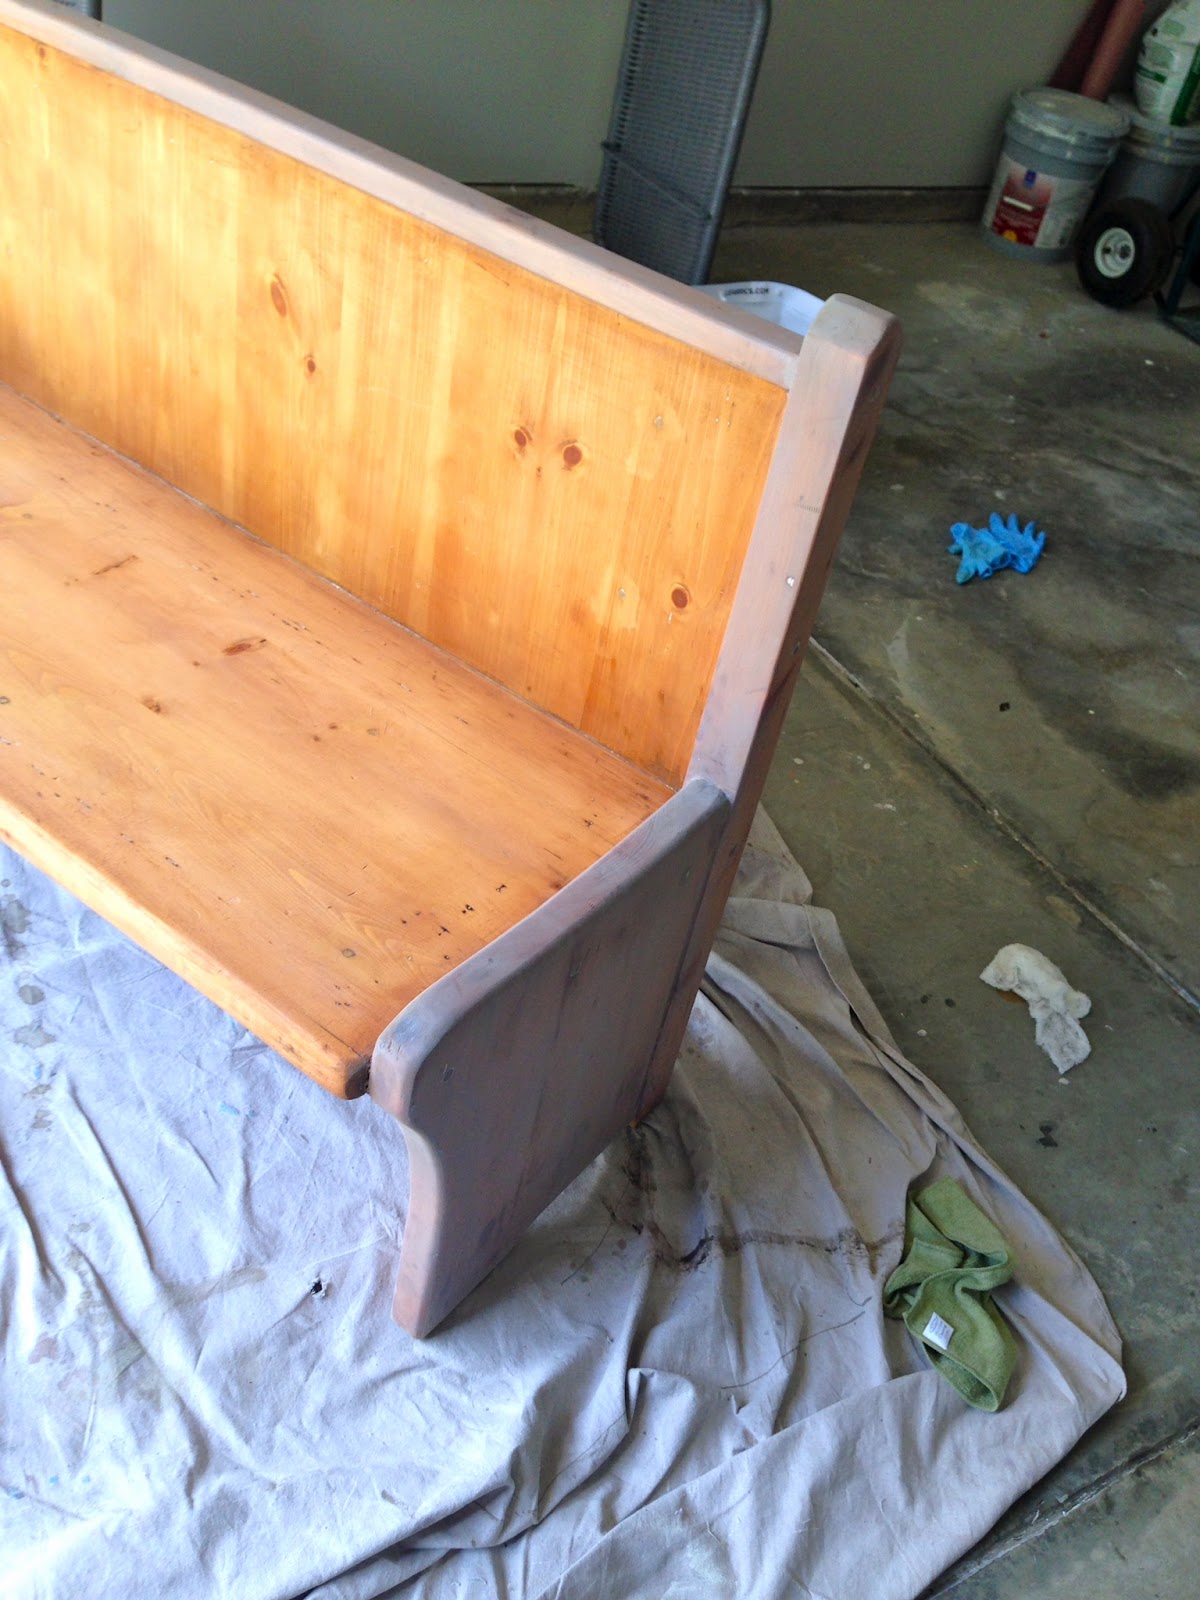
After even more sanding we finally got a blank slate. So clean and pretty!
Bench Sanded

Now the fun part...

I had a very specific vision for what I wanted the end product to look like. Problem? I didn't know how to get it there.

We have dark floors so I didn't want it too dark, but I still wanted it natural looking but a little darker than what it was while not really looking stained at all. Confused? So was I.

I tried one stain and hated it! It was orangey redish and all wrong.
Bench In Progress

My mom suggested a light grayish wash. Had she done it it would have looked great, but I did it so it didn't.

So, the only option I saw was to re-sand and start over...again. At this point James was done. He told me to do what I wanted, but he was over it. I can't blame his at all; I was impossible to please.

After thee trips to Home Depot and 2 different stains I was done. It wasn't working and I quit.

Y'all, I cried over bench. If it hadn't been for James stepping in it would have ended up smashed into a million pieces. Have I mentioned I can be dramatic at times?


It took a few days and a "get your act together" conversation with my sister to realize I was being ridiculous crazy.

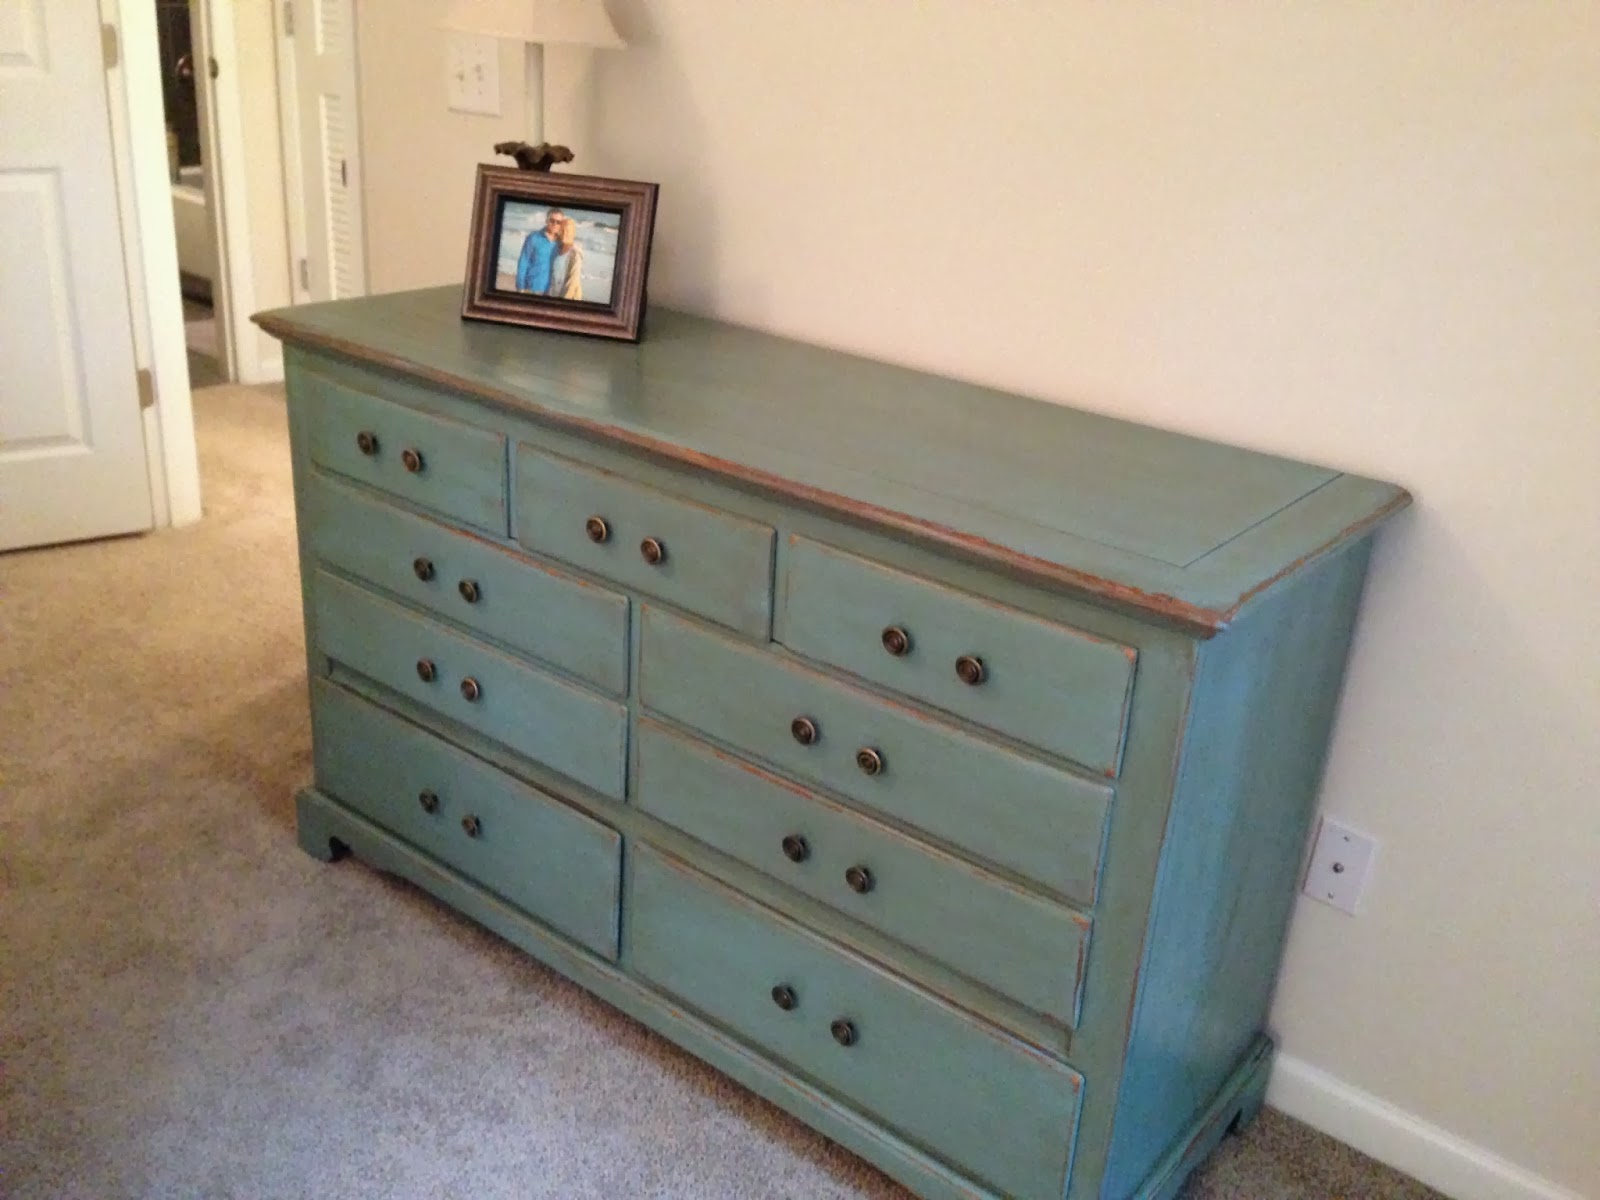
I went to Home Depot one more time picked up one more stain and was officially done. 
DIY Bench

I fell in love all over again. It doesn't match my original vision, but quite honestly it's even better. 

I told the husband I reserve the right to change it at any point. He said no. I don't blame him :)

 photo signature_zpsf929bc8c.png

Friday, October 25, 2013

5 ON Friday, Vol. 5

Happy Friday!
Apparently I've been doing Five FOR Friday while the rest of you have been doing Five ON Friday! We're all on the same page on; life can go on :)
Spending Friday morning with my favorite link-up ladies Darci, Natasha, April, and Christina

{O N E}

The new drawer pulls finally came in and I'm loving how they look! Also loving how the new round mirror adds a nice touch in breaking up all the straight lines {do I sound like I know what I'm talking about? I don't. Heard it somewhere and thought it sounded good}.


{T W O}

New office wall art from HomeGoods. They made me giggle every time I look at them.


{T H R E E}

Meet the new and improved Mosley. He got a makeover. I love him and his sweet hat. Growing up we always picked pumpkins based on their stem: the more character the better. I'm thinking this is more of a "top hat." It makes me love him even more. 


{F O U R}

We added a chandelier to our makeshift dinning room. Technically this was the sunroom, but we thought the table fit better here. There was no light in the room. Now we have a pretty chandelier. Doesn't add any light but who cares about that when it's pretty.
PS: Next DIY project will be staining this table DARK. It involves sanding. James is thrilled; sanding is his favorite {ya...right}.


{F I V E}

We may not live in the same state anymore, but we can still freeze together. Newlywed Problems: husbands won't turn the heat on. She's legitimately cold in a house that's down to 60 degrees. Me? I'm just a baby.

I'm super happy the dawgs have a bye week. Don't think I could handle another emotional game.
Have a happy happy weekend! 

 photo signature_zpsf929bc8c.png

Tuesday, October 1, 2013

Better In Color

Happy October!

For some reason I feel so grown up doing my first DIY project!

James' parents gave us the dresser that James used as a kid when we got our apartment. While there wasn't anything wrong with the dresser as it was, I thought a little freshening up couldn't hurt. My mom is an interior designer who I'm convinced could make a paper bag look like art. While I have ideas and have no clue what to do she understands and makes things happen!

This is the dresser my mom and dad have that I'm obsessed with. When I told her I wanted to do something similar to my new dresser she was confident we could make magic happen.


Here's the dresser before we did anything to it.
Aside from needing to reattach some of the handles it wasn't in bad shape.


We used Annie Sloan Chalk paint and wax for the project.

Seriously y'all, if you haven't used this stuff it's the JAM!
If you've ever painted before you know how much of a hassle it can be. First you have to sand {no thanks}, then you have to prime {I'd rather not}, and finally you have to paint on numerous coats to get good coverage {yawn}.
This stuff takes away all those steps. No sanding, no priming, and only two coats for great coverage!
Since it's chalk paint and we didn't want it rubbing off there were a few more steps after painting, but if I can learn how to do it anyone can.


Side note: I learned the lighting in our apartment is AWFUL! I apologize for the pictures I was
too lazy excited to use my tripod.

Since we didn't have to prime or sand the first step was painting. Usually I get bored painting after about two paint strokes; however, painting with this stuff is, dare I say it... fun!
We put two coats on the dresser and the drawers and then we were done for the day to let the paint dry.

So... when James got home from work and saw phase I of the project he was a little less than thrilled. I was in love already, but the color was a lot brighter than he was anticipating. Thankfully he is a great sport and trusted the vision.

Day 2 consisted of lots and lots of waxing! Like I said above, Annie Sloan is chalk paint so wax has to be put on top so the paint doesn't chip.
First we put on clear wax: spread it on, let it dry, and wipe it off.
Then we sanded the edges to add character.
Lastly we put on [then wiped off] a darker wax to age it up.

The drawer on the left is before we added the dark wax and the right drawer is after:


Ta Da!! It's almost finished!


We ordered these drawer pulls. Yup, I just said drawer pull... learned what those were two days ago! Now we're just waiting on them to come in from China.
Beautiful right?!?

Etsy

I'm not sure if I've said this or not but, I LOVE our old dresser with a new look!
Can't wait to see how it looks when it's completely done!